


Have you ever wondered what happens when an excavator’s swing bearing starts to fail? Replacing it might seem tricky, but it’s a task that can be handled with the right steps.
As an expert in heavy machinery repair, I know the ins and outs of excavator maintenance. My expert advice will guide you through this essential repair.
Replacing an excavator swing bearing involves a careful process. Each step is crucial to keep your machine running smoothly and extend its lifespan.
In this guide, you’ll learn how to safely remove the old swing bearing and install the new piece. We’ll also cover key tips on tools you’ll need to avoid pitfalls.
So let’s get started!
Quick Comparison Chart
Replacing an excavator swing bearing involves several steps that require careful attention and preparation. Each phase plays an essential role in providing a successful installation and proper function of the excavator. Here is a quick breakdown of each step:
| Step | Estimated Time | Key Tools Needed | Safety Tips |
| Step#1: Prepare the Work Area | 30 minutes | Barriers, cleaning supplies | Remove all unnecessary objects around |
| Step#2: Remove Boom and Arm | 1-2 hours | Wrench, hoist | Use a hoist to lift parts safely |
| Step#3: Access Swing Bearing | 30 minutes | Hydraulic jack, support blocks | Stabilize the excavator’s upper structure |
| Step#4: Detach Swing Motor | 45 minutes | Wrench, hydraulic caps | Cap hydraulic lines to prevent spills |
| Step#5: Remove Old Bearing | 1 hour | Hoist, wrench | Check for obstructions and lift carefully |
| Step#6: Inspect and Clean | 20-30 minutes | Wire brush, lubricant | Use protective gloves for cleaning |
| Step#7: Install New Bearing | 1 hour | Hoist, torque wrench | Check alignment before tightening bolts |
| Step#8: Reinstall Swing Motor | 45 minutes | Hoist, wrench, hydraulic lines | Ensure motor is aligned with the bearing |
| Step#9: Reassemble Excavator | 1-2 hours | Wrench, hoist | Double-check connections |
| Step#10: Test Excavator | 20 minutes | Excavator controls | Test rotation and listen for sounds |
| Step#11: Final Inspection | 15 minutes | Visual inspection, tools as needed | Check all bolts and hydraulic connections |
Step#1 Prepare the Work Area
Before starting any repairs, it’s important to prepare the area where you’ll be working. A clean and organized space helps prevent accidents and makes the job easier. Here’s how to prepare your work area:
- Clear the Surrounding: Make sure to remove any unnecessary objects, tools, or equipment near the excavator. This will give you more room to work safely and minimize the chances of tripping.
- Safety Barriers: If you’re working in an area where others are present, place barriers or signs around the site. This will keep unauthorized personnel from entering and help avoid accidents.
- Check Tools: Gather all the necessary tools like wrenches, hoists, and safety gear. Double-check that everything is in working order before beginning.
- Disconnect Power Sources: Turn off the excavator and disconnect the battery. This prevents the machine from moving unexpectedly during the repair process, keeping you safe.
Step#2 Remove the Excavator’s Boom and Arm
With the work area prepped and everything in place, it’s time to start the main disassembly. To remove the excavator’s boom and arm, here’s how to do it:
- Lower the Boom and Arm: Gradually lower the boom and arm using the excavator’s controls, making sure they rest on a stable surface. This makes it easier to detach them without the risk of them dropping.
- Disconnect Hydraulic Hoses: Carefully disconnect the hydraulic hoses connected to the boom and arm. Cap the hose ends to prevent dirt from entering and to avoid fluid spills.
- Remove Bolts: Use a wrench to unscrew the bolts holding the boom and arm in place. Be cautious of their weight and use a hoist or other support to prevent sudden drops.
- Set Aside the Boom and Arm: Once detached, lift the boom and arm using a crane or hoist, then place them in a safe location where they won’t interfere with your work on the swing bearing.
Step#3 Access the Swing Bearing
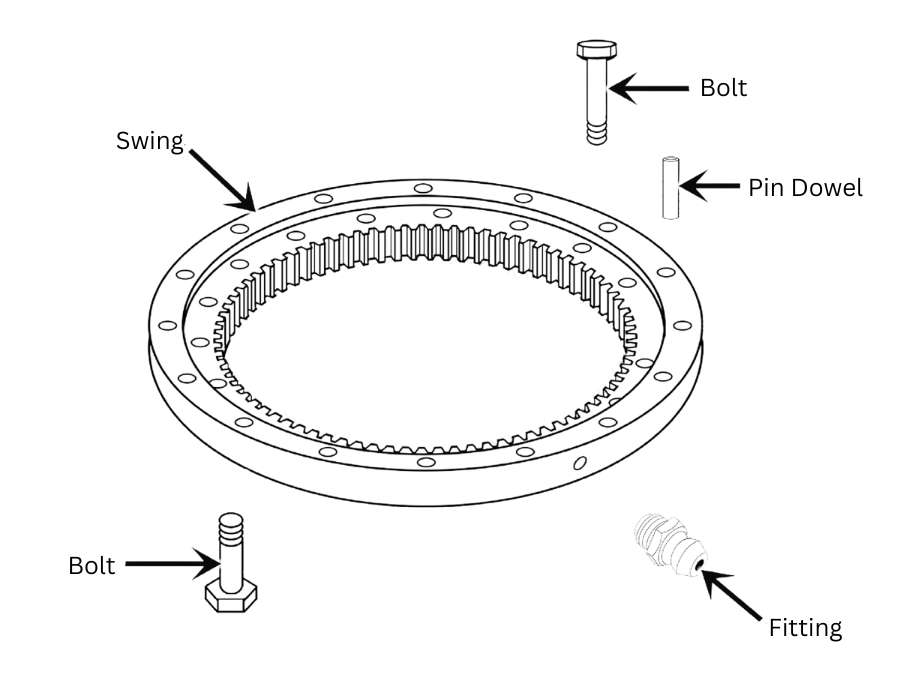
With the boom and arm safely out of the way, the next task is to gain direct access to the swing bearing. The swing bearing is responsible for allowing the excavator to rotate smoothly. Here are the steps to access it:
- Remove Covers: Start by removing any protective covers or panels that shield the swing bearing. These covers help protect the components from debris but must be taken off to access the bearing.
- Elevate Upper Structure: Use a crane to carefully lift the upper structure of the excavator. This creates space between the upper and lower sections of the machine, allowing you to work on the swing bearing.
- Secure Upper Structure: Once elevated, use support stands or blocks to keep the upper structure in place. This step is crucial for maintaining safety while working beneath the machine.
- Clear Obstacles: Inspect the area and remove any leftover components or debris that may block access to the swing bearing. A clear working space will make the bearing replacement smoother.
Step#4 Detach the Swing Motor
Now that you’ve exposed the swing bearing, the next step is to detach the swing motor. The swing motor drives the rotation of the excavator, and it is connected directly to the swing bearing. Here are the steps to safely detach it:
- Locate the Connections: Begin by identifying the hydraulic lines and electrical connections that are attached to the swing motor. These connections need to be removed before the motor can be detached.
- Disconnect Lines: Use the appropriate tools to carefully disconnect the hydraulic hoses connected to the swing motor. Make sure to cap the ends of the hoses to prevent dirt from getting inside and to avoid leaks.
- Unbolt Swing Motor: After disconnecting the hydraulic lines, use a wrench to remove the bolts securing the swing motor to the machine. Be prepared for the weight of the motor and use a hoist if needed.
- Remove the Motor: With the motor fully detached, lift it out of the excavator using a hoist and place it in a safe location. This step clears the way to remove and replace the swing bearing.

Step#5 Remove the Old Swing Bearing
With the swing motor out of the way, you now have full access to the swing bearing. The next step is to carefully remove the old swing bearing, which is often bolted tightly into place. Here are the steps to safely remove the swing bearing:
- Remove Mounting Bolts: Use a wrench or an impact driver to loosen and remove the bolts that hold the swing bearing in place. These bolts may be tight, so you may need extra leverage to loosen them.
- Lift the Bearing Out: Once the bolts are removed, use a hoist to lift the old swing bearing out of its position. Be cautious of its weight, as swing bearings are heavy and can be difficult to handle.
- Check for Obstructions: As you lift the bearing, check for any debris or rust that may cause it to stick. For instance, if the bearing is stuck, use a gentle pry to loosen it without damaging other components.
- Set the Old Bearing Aside: After successfully removing the bearing, place it in a safe spot away from the work area. You’ll need to clear space for the new bearing installation in the next steps.
Step#6 Inspect and Clean
Before installing the new swing bearing, it’s essential to inspect the area and clean all surfaces thoroughly. Here are the steps to inspect and clean the swing bearing area:
- Inspect Mounting Surface: Look closely at the mounting surface where the old bearing sat. Check for any cracks, rust, or worn spots that may affect the new bearing’s installation or performance.
- Clean the Surface: Use a wire brush or scraper to clean off any debris, dirt, or old grease from the surface. A clean surface is critical to ensuring smooth rotation of the new bearing you purchased from EPO.
- Check for Wear on Adjacent Parts: While you’re inspecting, check the nearby components like gears or shafts for any signs of wear. Replacing damaged parts now can save you trouble later on.
- Apply Fresh Lubrication: Once the surface is clean, apply a fresh layer of grease or lubricant to the contact points. Make sure to apply it properly, because as per Maintenance World, improver lubrication can cause equipment failure up to 50%.

Step#7 Install the New Swing Bearing
After thoroughly inspecting and cleaning the area, it’s time to install the new swing bearing. Here are the steps to correctly install the new swing bearing:
- Position the New Bearing: Carefully place the new swing bearing from EPO into the cleaned mounting area using a crane or hoist. Make sure it is aligned with the bolt holes before lowering it into position.
- Hand-Tighten the Bolts: Start by hand-tightening the bolts to keep the bearing securely in place while you prepare to torque them down. This initial step helps the bearing sit evenly without causing damage.
- Torque the Bolts: Using a torque wrench, tighten the bolts to the manufacturer’s recommended specifications. This step is crucial to secure the bearing and avoid loosening during operation.
- Check the Fit: Once all the bolts are tightened, manually rotate the upper structure to check that the new bearing moves freely. This confirms that the installation was successful.
Step#8 Reinstall the Swing Motor
With the new swing bearing in place, the next step is to reinstall the swing motor. The motor is essential for powering the rotation of the excavator, and reconnecting it properly allows the machine to operate smoothly. Here’s how to reinstall the swing motor accurately:
- Align the Motor and Bearing: Use a hoist to lift the swing motor and align it with the new swing bearing. Proper alignment is key to making sure the motor fits securely into place.
- Bolt the Motor: Once aligned, secure the motor using the bolts you removed earlier. Tighten them evenly to prevent uneven pressure on the motor or bearing.
- Reconnect Hydraulic Lines: Carefully reconnect the hydraulic hoses to the swing motor. Make sure the connections are clean and free from dirt to avoid contamination in the hydraulic fluid.
- Test the Motor’s Operation: After everything is connected, test the motor to check if it engages the swing bearing smoothly. This will help you identify any potential issues before reassembling the excavator.
Step#9 Reassemble the Excavator
With the new swing bearing and motor securely in place, it’s time to reassemble the rest of the excavator. This step involves putting back the components you removed earlier. Here are the steps to properly reassemble the excavator:
- Position the Boom and Arm: Use a hoist to carefully lift the boom and arm and align them with their mounting points on the excavator. Make sure they are balanced to avoid any shifting during reinstallation.
- Reconnect Hydraulic Hoses: Reattach the hydraulic hoses to the boom and arm that were disconnected earlier. Double-check that each hose is connected to the correct port to avoid operational failures.
- Bolt the Boom and Arm in Place: Once aligned, bolt the boom and arm back into their original positions. Tighten the bolts evenly to keep the structure balanced and secure.
- Remove Safety Barriers and Tools: Once everything is reassembled, clear the work area by removing barriers and tools. This will prepare the machine for testing and final inspection.
Step#10 Test the Excavator
After reassembling the excavator, it’s important to test the machine to verify that the swing bearing and motor are functioning correctly. Here are the steps to properly test the excavator:
- Turn on the Excavator: Power up the excavator and let it idle for a few minutes. Listen to any unusual noises that may indicate a problem with the newly installed swing bearing or motor.
- Test the Rotation: Slowly rotate the upper structure of the excavator to test the swing bearing’s movement. The rotation should be smooth without any jerking sounds.
- Operate the Boom and Arm: Raise and lower the boom and arm to check if the hydraulic systems are functioning properly after reassembly. This certifies that everything was reconnected correctly.
- Check for Leaks: After running the excavator for a short period, inspect the machine for any signs of hydraulic fluid leaks. Address any issues immediately to prevent damage during full operation.

Step#11 Perform Final Inspection
Now that the excavator has been reassembled and tested, the final step is to perform a thorough inspection. Below are the steps to complete the final inspection:
- Check Bolts and Fasteners: Inspect all bolts, especially those on the swing bearing, swing motor, boom, and arm. Tighten any that may have loosened during testing to make sure everything is securely fastened.
- Inspect Hydraulic Connections: Examine all hydraulic hoses for any leaks or loose fittings. For example, look for signs of wear, and replace any damaged components to prevent future breakdowns.
- Test the Swing Motion: Rotate the upper structure of the excavator once more to double-check the smoothness of the swing bearing. The movement should be fluid, without any resistance or strange noises.
- Review the Work Area: Finally, clean up the work area and remove any remaining tools, debris, or materials. This keeps the space safe and checks if the excavator is ready for full operation.

Conclusion
Replacing an excavator swing bearing is a step-by-step process that requires attention to detail and careful handling of heavy parts. Following these instructions can help you avoid unnecessary downtime and costly repairs.
In conclusion, this guide provides everything you need to replace a swing bearing efficiently. If you’re tired of suppliers misunderstanding your needs, EPO is here to help. As a supplier of excavator parts with 25 years of experience and a fast quotation system, we are committed to meeting your exact requirements with precision. Contact us today to learn more!